
This is a step-by-step guide to buying bitcoin on Bisq, a decentralised peer-to-peer exchange. If you’re unfamiliar with private peer-to-peer trading, start with my overview of non-KYC bitcoin options first. The case for buying privately, and the high-level comparison between platforms, lives there.
If you’re already here, you’ve probably decided on Bisq. Let me explain quickly when I’d pick Bisq over the alternatives (including Bisq Easy), and then we’ll get started.
Why Bisq?
Bisq 1 is the most battle-tested option for buying meaningful amounts of bitcoin with a strong security model. It’s a decentralised peer-to-peer exchange that’s been running since 2016, uses 2-of-2 multisig escrow (so funds are locked until both parties are happy), routes all traffic through Tor, and supports fiat payment methods like Faster Payments and SEPA. The trade-off is that it’s a slow desktop application and requires a small bitcoin security deposit on each trade.
For larger or recurring buys, that deposit pays for itself in liquidity and trade size. If you’re starting from zero with no bitcoin to post as a deposit, Peach or Bisq Easy might be better starting points - both work without a security deposit, at the cost of smaller trade sizes.
Step by step: buying bitcoin on Bisq
1. Download and install
Head to bisq.network/downloads and select the installer for your OS. Bisq runs on Windows, macOS, and Linux.
When you first open it, it’ll take a minute or two to connect. Bisq routes all traffic through Tor automatically (you don’t need to configure anything), and it syncs with the peer-to-peer trading network on startup. There’s no account to create or email to verify - it’s effectively anonymous at this point.
2. Secure your wallet
The Bisq application will create a wallet for you, to hold your security deposit and receive any bitcoin you buy. You can and should withdraw periodically to cold storage, as you would using a centralised exchange.
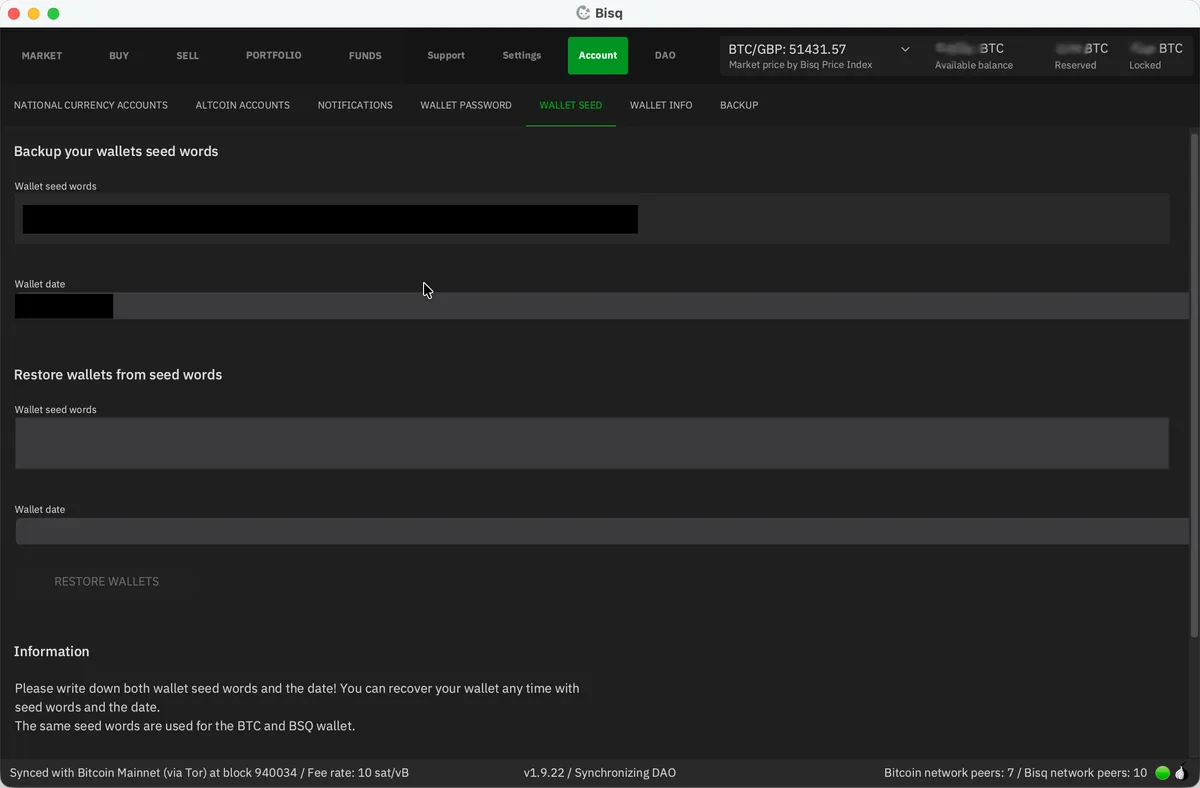
You need to set a wallet password and write down your seed words. Go to Account / Wallet Seed and write down the seed words on paper. Store them somewhere safe. Then go to Account / Wallet Password and set a strong password for the Bisq application.
This wallet - and all your Bisq data - lives on your computer. There’s no “forgot password” button, no account to recover or support team to help you. If your computer dies and you haven’t backed up, it’s gone.
For this reason, you should take regular backups - and make your first while you’re here. Head to Account / Backup and export a copy of the Bisq data directory. It contains your wallet, your payment accounts, and your trade history.
3. Add a payment account
To buy bitcoin using fiat currency (i.e. GBP / USD / EUR), you need to add your bank account details to Bisq. These will be stored locally on your machine; they’re never sent to any remote server, and Bisq does not handle fiat currencies at all.
Why, then, does Bisq need bank account details? Two reasons.
- So your trading partner knows who to expect the money to come from (or, if you’re selling bitcoin, so that your trading partner knows who to pay)
- To measure account age - while Bisq 1 doesn’t have a reputation system, you can see how long a counterparty’s account has been active before accepting a trade.
Go to Account / National Currency Accounts and click Add New Account.
Select your payment method from the dropdown. In the UK, Faster Payments is the obvious choice - this is the system which powers modern bank transfers. It’s near-instantaneous and there’s decent liquidity on Bisq. In Europe, SEPA is the standard option, though trades take longer due to bank transfer times.
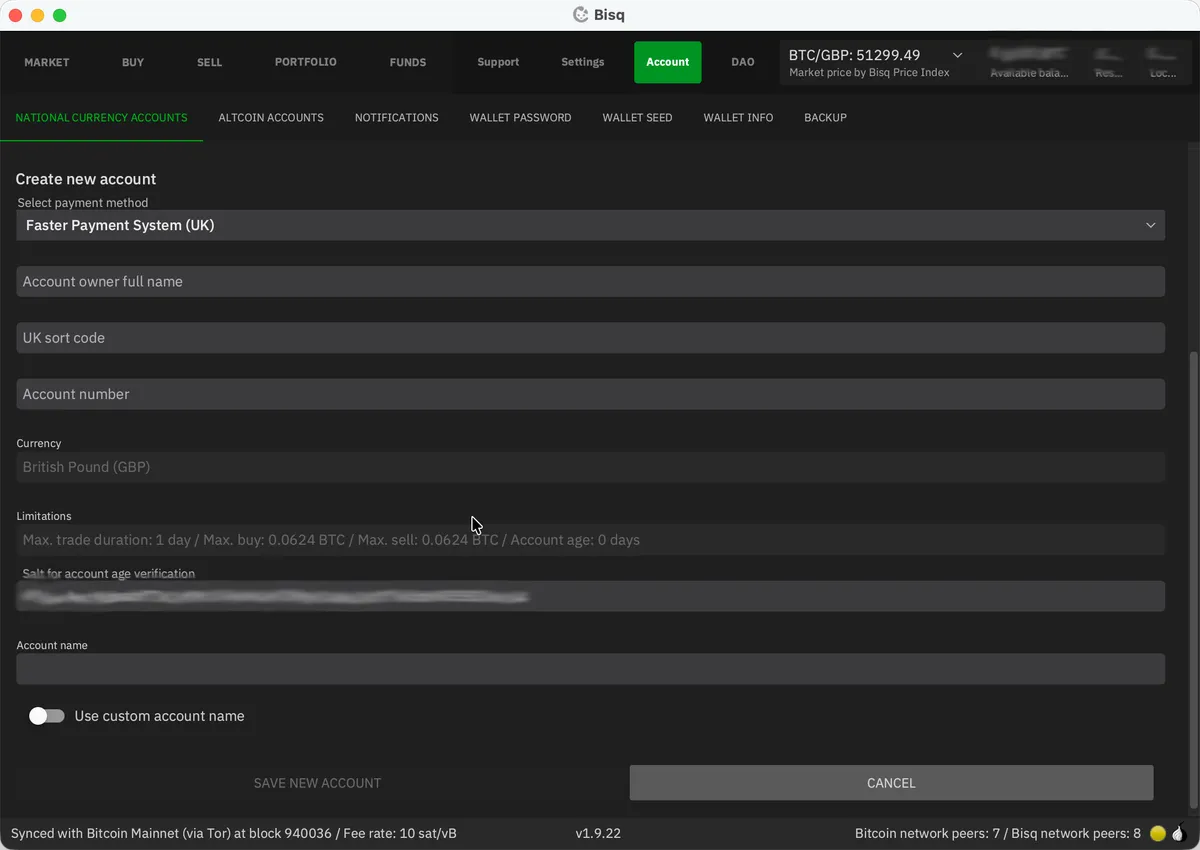
Enter the details exactly as they appear on your bank account. This is important - your seller will need to match the payment they receive to the details you enter here. If you make a mistake, you can’t edit it after saving; you’ll have to delete and re-add the account (resetting its age to zero).
4. Fund your Bisq wallet (the catch 22)
Bisq requires both buyer and seller to post a security deposit in bitcoin for every trade. For buyers, this is typically 15% of the trade amount, with a minimum of 0.001 BTC. Add mining fees and trading fees on top, and you’ll realistically need around 0.002 BTC (about £100, as of early 2026) to get started.
So yes - you need bitcoin to buy bitcoin. The most practical ways to get your initial deposit:
- Friends & family. Ask someone you trust if they’ll sell you a small amount of bitcoin to get you started. This is probably the best option, especially if you know other bitcoiners - most will be more than happy to help get you started.
- Use Bisq Easy. Download Bisq 2 (it runs alongside Bisq 1 without conflict), buy a small amount through Bisq Easy’s reputation-based protocol, and transfer it to your Bisq 1 wallet. This keeps everything private from the start.
- Find a Bitcoin ATM. Many ATMs don’t require ID for small transactions. coinatmradar.com will show you what’s nearby. Expect a premium - ATM operators typically charge 5-10% above spot.
- Buy it using a KYC exchange. I’d advise strongly against this. While centralised exchanges have their place, mixing your KYC and non-KYC coins is a big no-no - it creates a permanent link between your identity and your anonymous coins which cannot be undone.
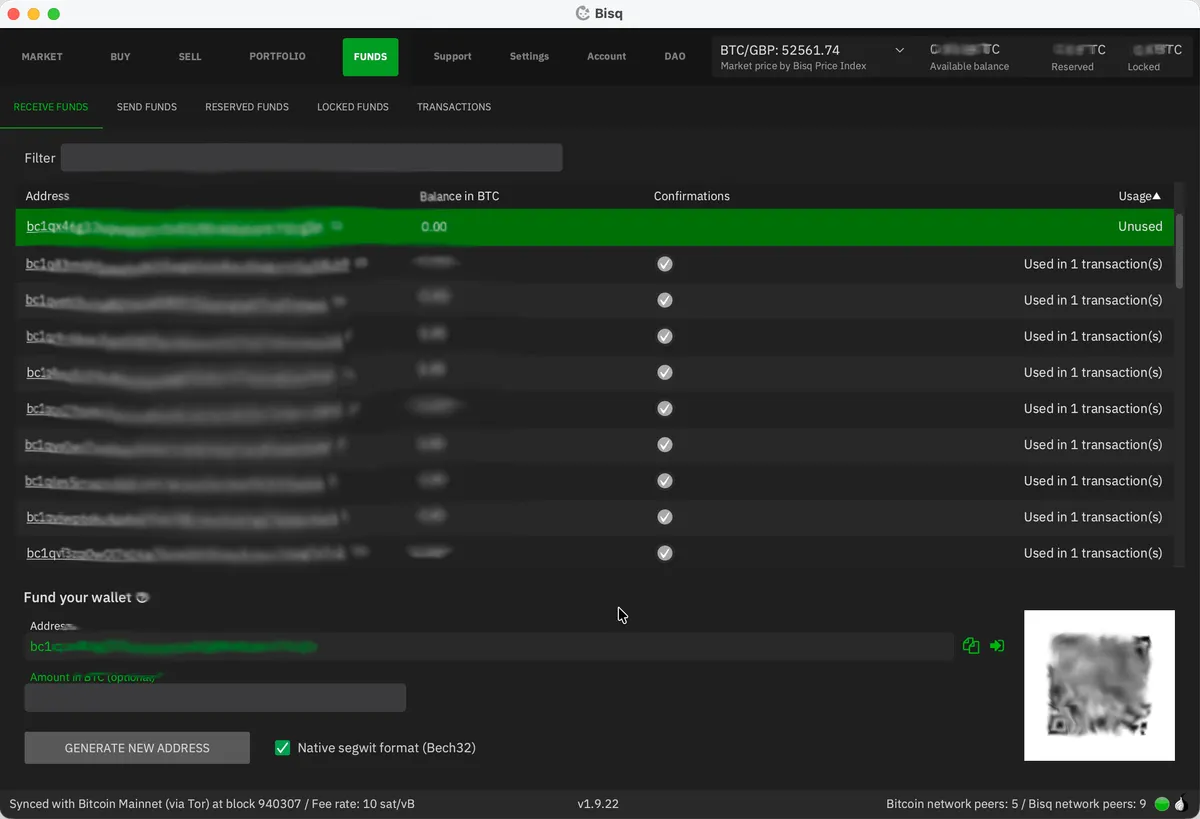
More ideas can be found on Bisq’s wiki. Once you have enough BTC, go to Funds / Receive Funds in Bisq and send your bitcoin to one of the listed addresses. Wait for it to confirm on-chain - one confirmation is enough, so roughly 10 minutes.
5. Find and take an offer
Time for some actual trading. Let’s look at the Market / Offer Book tab:
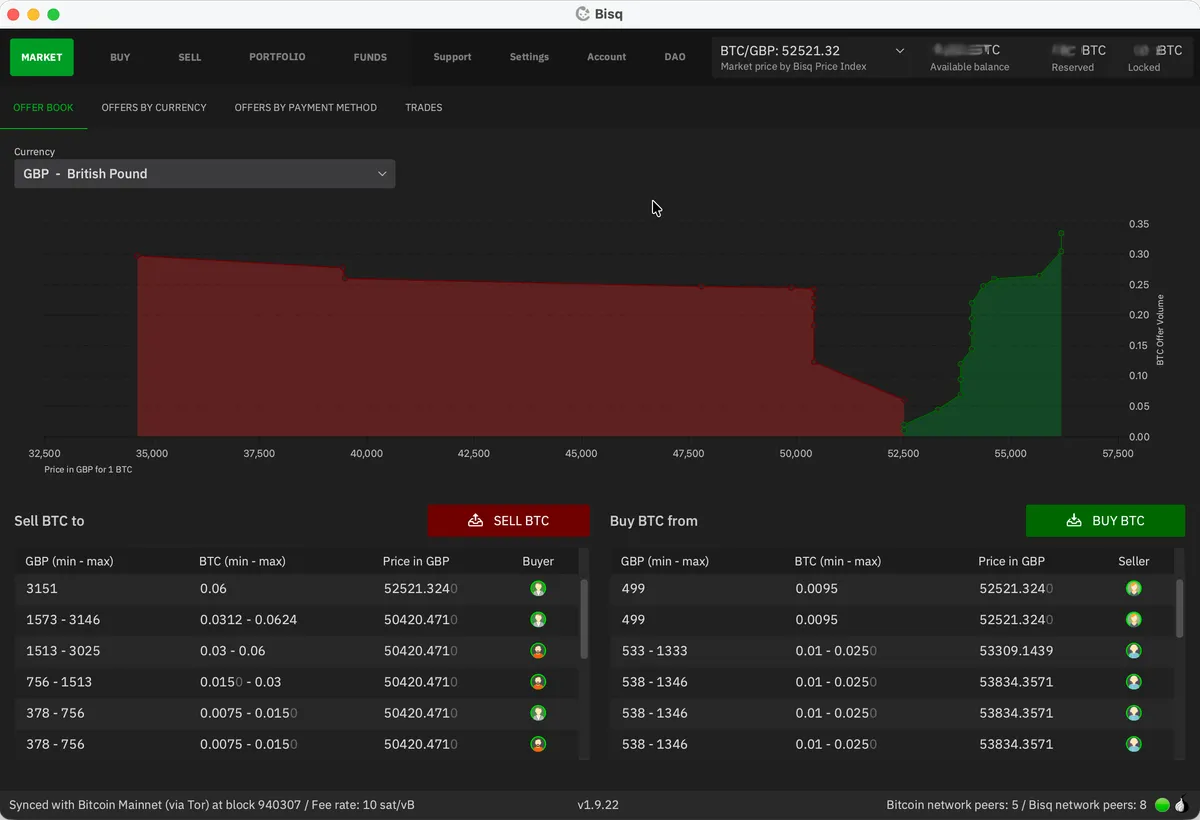
This shows the current buy and sell offers in your chosen currency, along with the price spread between them. It’s normal to pay a “non-KYC premium”, and 1-2% above spot is typical. But if you’re patient, you can often find someone selling at or near spot price. The screenshots above and below - taken while writing this guide - show just such an occasion. Occasionally I’m able to nab an offer from someone selling below spot (e.g. -0.5%).
As a buyer, you can choose to accept an offer from a seller (i.e. be a taker) or to list an offer to be shown to potential sellers on the Sell BTC tab (i.e. be a maker). The combined BTC trading fee on Bisq is 1.3%, with more than 1% being borne by the taker (person accepting an offer). This asymmetry - common to all exchanges - is designed to encourage market makers to be competitive and add liquidity.
For your first buy I’d encourage you to take an offer. It avoids waiting around for a seller to accept your offer and makes for a simpler first experience with Bisq. Head to the Buy / Bitcoin tab, making sure you’ve filtered to your chosen currency and payment method.
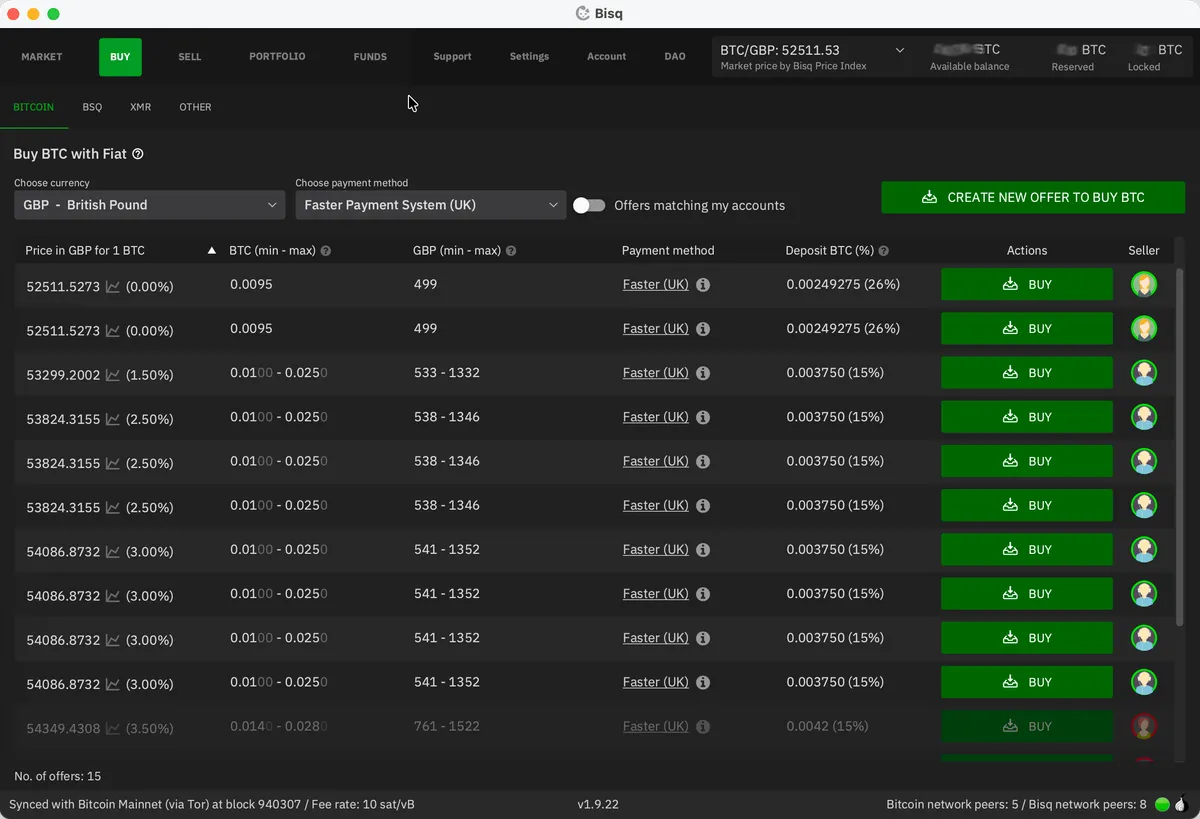
Each offer shows:
- The price (expressed as a percentage above or below the current spot price)
- The amount range (min and max BTC the person is willing to sell)
- The required security deposit percentage (normally 15%)
Find an offer that works for you and click Buy. If the offer is for a range, this is where you’ll decide how much bitcoin you want to buy - all other fields are locked. Review the fee information at the bottom, then hit Next step.

If your Bisq wallet is already sufficiently funded to cover the security deposit, you’ll jump straight to the summary screen. If not, you’ll be prompted to deposit the necessary funds before continuing.
The summary screen confirms the exact amount of BTC you’ll receive, the fiat amount you’ll need to pay, the security deposit required, and the fees. Look at this carefully. Once you hit Confirm: take offer to buy bitcoin, you’re committed and your security deposit will be locked in escrow.
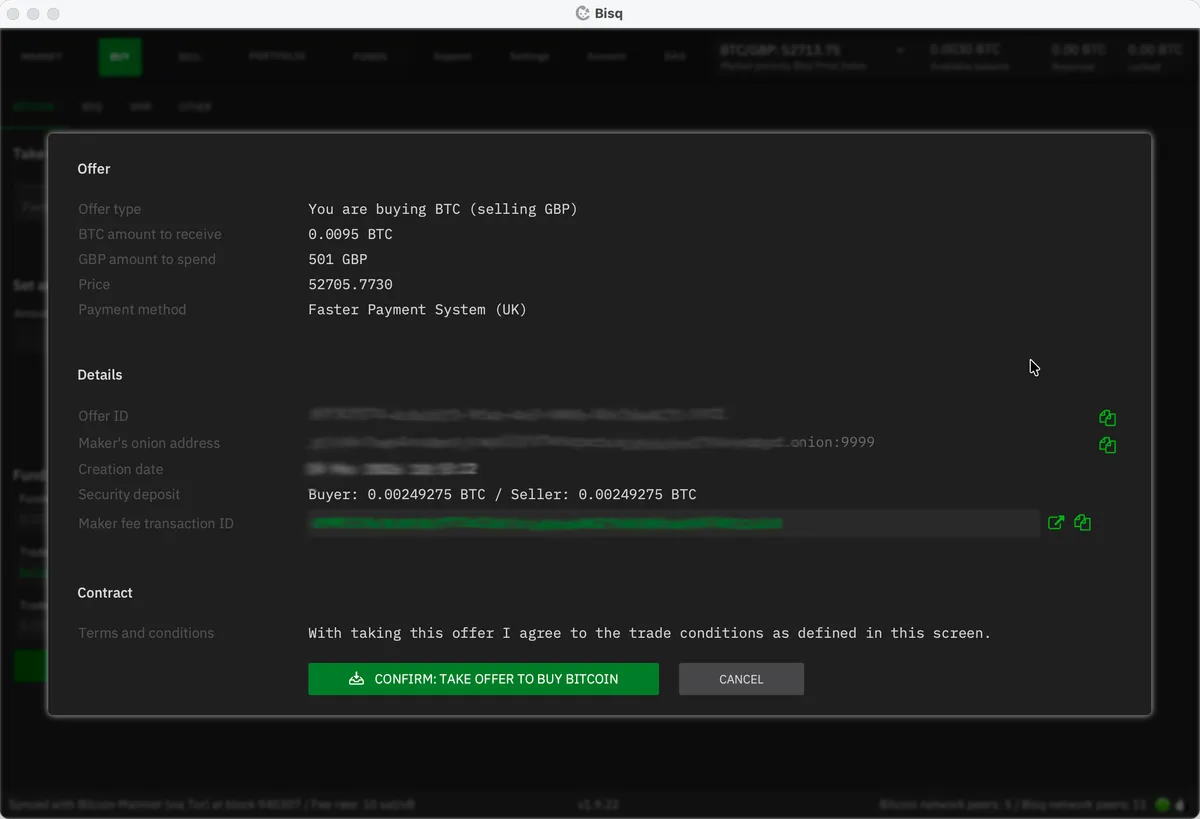
Time to buy some bitcoin!
6. Send your fiat payment
Once the trade is confirmed and the deposit escrow transaction has at least one blockchain confirmation (~10 minutes), Bisq will show you the seller’s bank details in the “Start payment” step.
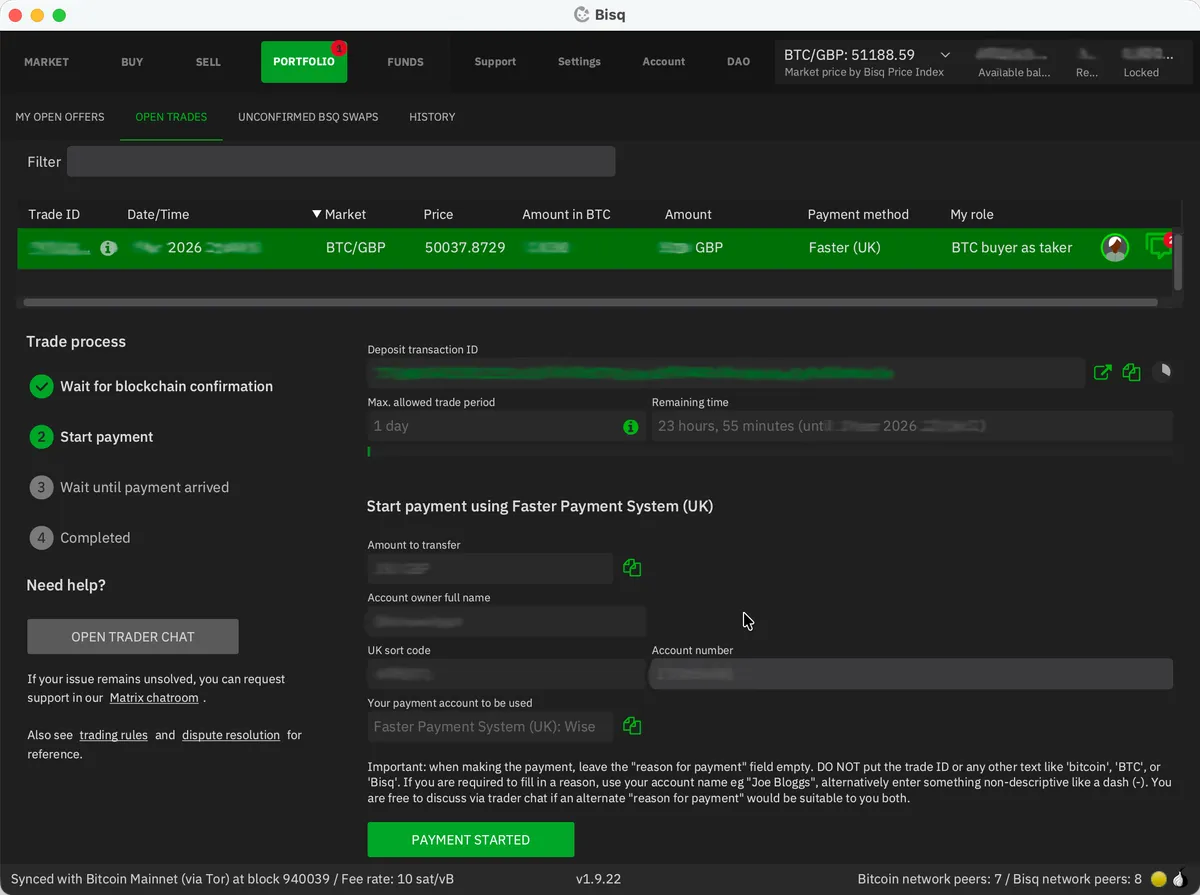
Send the agreed amount via your chosen payment method, from the same bank account you registered in Bisq. Do not put anything related to Bitcoin or Bisq as the payment reference - if your banking service requires some text here, use the seller’s name or agree on a suitable alternative with them using the chat box.
A crucial detail: Bisq has no integration with your bank. It can’t see whether you’ve paid. After sending payment, you must click the Payment Started button in Bisq to notify the seller. Forget this step and your trade will stall.
For bank transfers via Faster Payments, the actual transfer should take only seconds. For SEPA, it could take a day or two. There’s a countdown timer - the seller needs to receive your payment before it expires, so act quickly.
7. Wait for completion
The seller will check their bank account, confirm they’ve received your payment, and click Payment Received on their end. Once this is complete, Bisq releases the bitcoin from the multisig escrow.
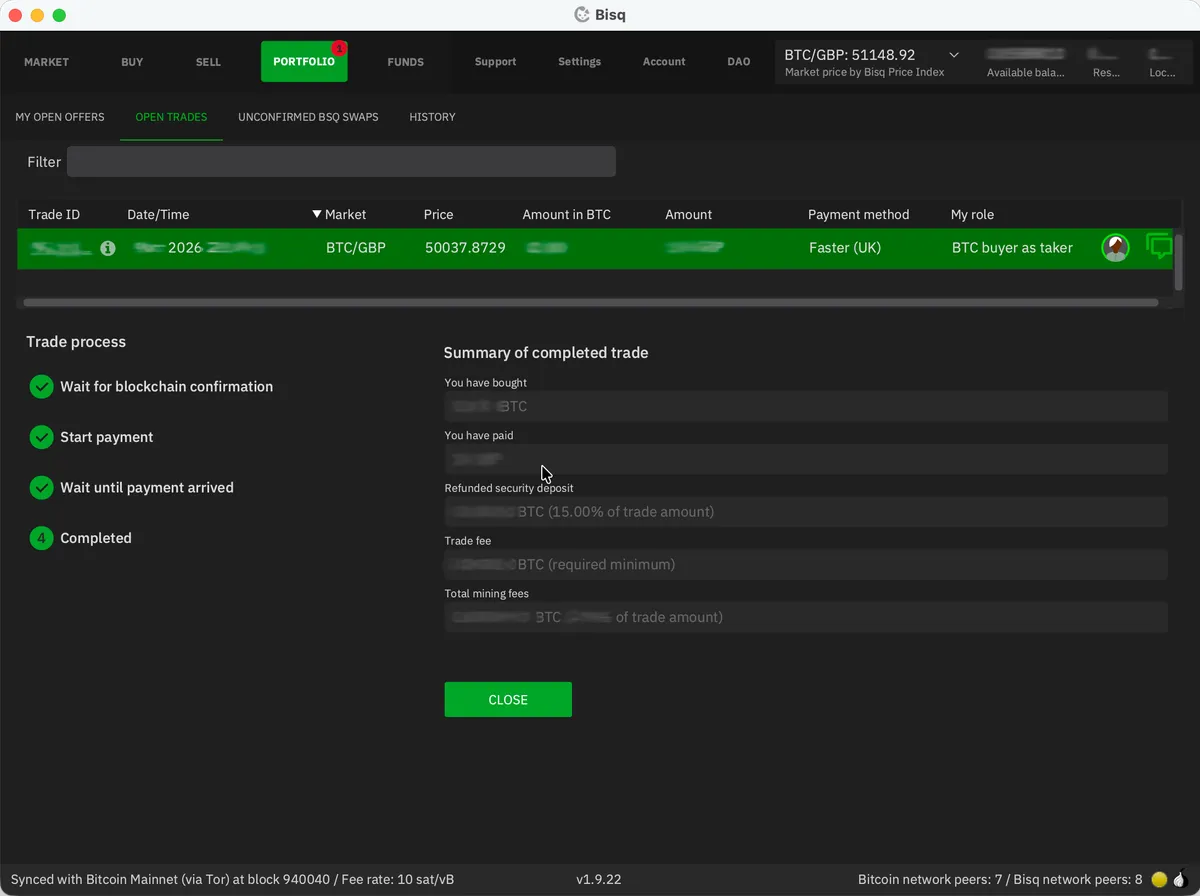
The bitcoin you’ve bought will be added to your Bisq wallet along with your refunded security deposit. Much like with any exchange, I’d recommend periodically withdrawing to your own hardware wallet. Be sure to keep this entirely separate from wherever you store your KYC bitcoin; mixing the two defeats the purpose. I’d recommend creating a separate account within your hardware wallet for your “clean” bitcoin.
And that’s it. You’ve just bought bitcoin without handing over a single piece of identification.
A few things worth knowing about Bisq
- Your Bisq application must be running for your offers to be visible. If you create an offer (rather than taking someone else’s), it disappears from the network the moment you close Bisq. This is fundamentally different from a centralised exchange. Plan accordingly.
- Disputes happen, but rarely. Bisq has a three-tier resolution system: first you and your trading partner try to resolve it via encrypted chat, then a mediator steps in, and finally an arbitrator can make a binding decision backed by the DAO. In years of trading, I’ve never needed to use it, but it’s reassuring that it exists.
- Spread out your buys. Banks have been known to flag users who send money to lots of new recipients in a short space of time. A nice reminder that the money in a bank account is not really yours. I’d suggest spreading out your buys, doing a few larger trades rather than lots of little ones, and using multiple accounts (e.g. your regular bank account, plus a Wise or Revolut account, and so on).
- Your tax obligations remain the same. You’re still responsible on that front, and it’s beyond the scope of this guide.
Welcome to the other side
You’re now equipped to buy bitcoin without anyone’s permission - and to do so as often as you like. Withdraw periodically to your own hardware wallet, keep your KYC and non-KYC stacks strictly separated, and you’re in good shape.
For the bigger picture on why this matters - and how Bisq compares to alternatives like Peach - see my overview of non-KYC bitcoin options.
Support the site
Thanks for reading. If you found this guide valuable, you can support my work by sending me bitcoin:

Scan with Tap to open your Bitcoin wallet, or copy the on-chain address below.

Scan with Tap to open your Lightning wallet, or copy my Lightning address below.